![]()

 I picture him lurking in his darkened Los Angeles laboratory surrounded by bubbling flasks and beakers connected by weird coils of glass tubing -- a forest of film dangling from every possible hanger. He's "Doctor" Wood, the "mad" genius who has developed an extraordinary photo process for being able to transform more than twenty different types of black and white negative (print) film into the most beautiful black and white and sepia-toned transparencies (slides) that you have ever seen. David Wood, the "inventor" of this exceptional black and white reversal photo process started out as a photographer in New York City. His desire to find a new presentation medium for black and white photography -- his passion since college -- led him to begin experimenting with an old black and white reversal process used by movie companies during the silent film and early "talkie" eras of the 1920s and 30s. The "Doctor's" alchemy is based on the formulas he found in old Photo-Lab-Index type publications for black and white movie processing procedures, plus his own home-style experimentation. His early efforts (like that of most mad scientists) met with failure. The old formulas did not work well with modern negative films. But because his interest in processing his own black and white transparencies was so keen, numerous experiments followed -- including one where a certain mix of chemicals smoked out the occupants of the entire building which housed his studio, requiring assistance from the fire department.
I first learned about .dr5 at the 1999 NANPA meeting in San Diego during a conversation with Magdi Szaktilla of A & I Color Labs based in Hollywood, California. I was interested in experimenting with Agfa Scala black & white slide film as an occasional alternative to the color slide film for wildlife and scenics that I was shooting. Since A & I does the majority of my film processing, my question was: Could A & I process Scala since it requires a special development process? Her answer was, "No, but the principal owners of A & I Color Lab were also involved with an A & I Color Lab "sister company" called AIM Color. One of their newly introduced products would be a unique process called .dr5 that will convert standard black and white print film -- the kinds many of us used in school like Kodak Tri-X -- into transparencies."
I was skeptical, yet eager to give this new process a try, especially when I learned that the process also had a means of producing sepia-toned transparencies from the same films. These days, since stock photography has become so competitive, a new twist or a different look to my shots would be important to have them stand out from the crowd on an editor's light table, so .dr5 could be exactly what I was looking for -- and it was! Black and white films that are being shot for the .dr5 process are treated in-camera exactly as you would any E-6 (slide) film. Exposure procedures are exactly like those for your "normal" slide film -- so if you've never shot black and white for prints, you do not need to learn the exposure techniques for making black and white prints as none of them apply with .dr5! Shoot and expose as you normally would for color slides. A very big difference between E-6 films (like Fuji Velvia or Ektachrome E-100 SW) and .dr5-processed films, is that the E-6 films have an approximate tonal range of 5 stops. But black and white film in the .dr5 process produces the best tonal range you'll see on film -- up to 10 stops. Its formulation produces extreme detail in the blackest blacks and the whitest whites. Details pop out of these slides like you've never seen on film before! I spoke with David Wood about the process and the various films that could be used in .dr5. I wanted to get suggestions as to how to shoot these negative films to get the best conditions for creating black and white transparencies and my own special interest, the sepia-tones. The "Doctor" told me to completely forget that the films being shot for the .dr5 process are negative films and to treat them as entirely new films -- as if new emulsions for E-6 just came on the market. That means that each of the twenty-plus films that can go through the .dr5 process should be tested, just like you would a new color slide film that might be released by Fuji or Kodak. Each of the black and white films from the long list of those that can be processed in .dr5 responds differently to the process -- with very unique looks. And the result you'll like the best is yours to discover!
Loading the film into the camera requires additional care with film destined for the .dr5-processing lab. Film responds four or five times more sensitively to light under .dr5 processing than in normal usage. You therefore should load the film into your camera (especially large format cameras) in as dark a situation as possible, or in a changing bag -- like you might with infrared film. Loading film in bright light could result in fogging or "burned" areas around the edge
David has done extensive testing of each of the films compatible with .dr5 chemistry. He's come up with his own set of ISO numbers for each film that works in the .dr5 process. For best results, David advises exposing your film at his .dr5 recommended ISO for each film (some are listed below -- the rest are on the .dr5 website) not the ISO recommended by the manufacturer. Pushing the film (processing or exposing at an ISO above the .dr5 recommended ISO) will increase the contrast and the highlights -- dramatically in some films. Pulling the film (processing or exposing at an ISO below David's recommended ISO) will reduce the contrast, which is great for unwanted "contrasty" situations. For many films David contends that processing results by pushing or pulling the film at a different ISO than their recommendation should be considered "experimental." Several black and white films in .dr5 have multiple push and pull capabilities and some like Kodak TX (Tri-X) can be set at one of six ISO speeds -- 200iso, 320iso, 400iso, 500iso, 800iso and 1000iso. Each speed produces a different quality in the film and, in general, the higher the ISO the greater the contrast the film will yield. Kodak TX and Kodak TXP are the best films for consistent pushing and pulling results.
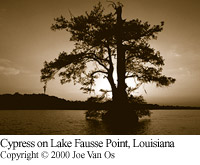
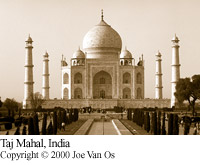
When you send your film to AIM Color you can request your film to be placed in one of two developer chemical processes developed by David Wood. One developer renders the film nearly black and white; the other is the warm brown/sepia-tone formula. All of my photos accompanying this article were processed for sepia tones and I'm really pleased with the results. In order to send your film to AIM Color you need to provide the following information before they can start the processing:
Here are David's recommended ISO settings for
the films listed above. For more precise information about the ISO
settings,
info on other films that can be used in .dr5, processing fees (they're
relatively expensive -- it's custom work), and a ton of other useful
information regarding the process, visit their website at www.dr5.com Kodak TX (Tri-X) - The normal speed for
TX to be processed in .dr5 is 320iso, but can be set at a broad
range of ISO's as indicated in the above article. Sepia-tones are less
pronounced in darker images shot with TX. |
||||||||||||||||


 Joseph Van Os Photo Safaris, Inc. P.O. Box 655, Vashon Island, Washington USA 98070 Phone: (206) 463-5383 Fax: (206) 463-5484 Email: info@photosafaris.com Copyright © 2000, Joseph Van Os Photo Safaris, Inc. |